想完联网AI,所以有了本篇文档,这里我选择的是 安装open-webui 和 ollama。
至于为没什么没有选择在裸机进行部署是因为 open-webui 前端编译失败。
本次演示在 docker下进行 你需要先将显卡通到 docker。参考 ubuntu24 安装 cuda
安装 open webui
新建 open-webui 目录并创建 compose.yaml 文件,并写入以下内容。
1
2
3
4
5
6
7
8
9
10
11
12
13
14
15
16
17
18
19
20
21
22
23
24
25
26
27
28
29
30
31
32
33
34
35
36
37
| services:
ollama:
volumes:
- ./ollama:/root/.ollama
container_name: ollama
pull_policy: always
tty: true
restart: unless-stopped
image: ollama/ollama:latest
deploy:
resources:
reservations:
devices:
- driver: nvidia
count: all
capabilities: [gpu]
open-webui:
image: ghcr.io/open-webui/open-webui:main
container_name: open-webui
volumes:
- ./open-webui:/app/backend/data
ports:
- 3000:8080
environment:
- 'OLLAMA_BASE_URL=http://ollama:11434'
- 'WEBUI_AUTH=False'
- 'HTTP_PROXY=http://192.168.1.200:7897'
- 'HTTPS_PROXY=http://192.168.1.200:7897'
- 'NO_PROXY=127.0.0.1,localhost,ollama'
extra_hosts:
- host.docker.internal:host-gateway
restart: unless-stopped
volumes:
ollama: {}
open-webui: {}
|
运行应用
查看日志
在open-webui的日志里看到 Fetching 30 files: 100%|██████████| 30/30 [06:58<00:00, 13.96s/it】 就是初始化完成了。
如果的的网络受到
打开浏览器访问 http://127.0.0.1:3000/ 即可开始使用。
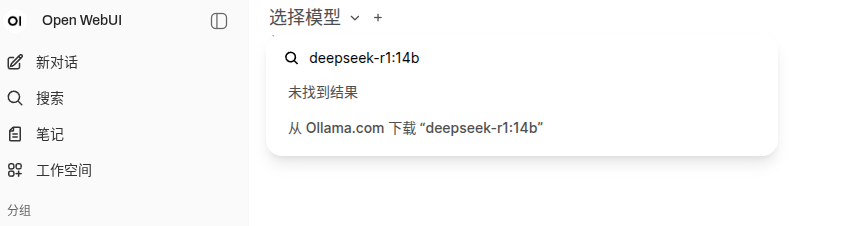
访问 https://ollama.com/library 选择要使用的模型,然后点击首页的选择模型,在搜索框里粘贴模型名称选择从 Ollama 下载就好。这里选择的是 deepseek-r1:14b
删除应用
一些其他设置,可以在 管理员面板 -> 设置 -> 外部连接 关闭 OpenAI 接口,因为使用本地模型用不到
1
2
3
| docker compose down
docker compose rm -f
sudo rm -rf ollama/ open-webui/
|
安装 SearXNG
搜索引擎我使用的是聚合搜索引擎 SearXNG
在 open webui平级目录创 searxng 目录并进入目录。
1
| mkdir ../searxng && cd ../searxng
|
创建 compose.yaml 并写入以下内容 内容我参考的 https://github.com/searxng/searxng-docker 仓库,并且把所有数据卷放到了当前目录,并修改暴露端口监听0.0.0.0。
这里需要将 SEARXNG_BASE_URL 的值需要替换为物理机的ip。
1
2
3
4
5
6
7
8
9
10
11
12
13
14
15
16
17
18
19
20
21
22
23
24
25
26
27
28
29
30
31
32
33
34
35
36
37
38
39
40
41
| services:
redis:
container_name: redis
image: docker.io/valkey/valkey:8-alpine
command: valkey-server --save 30 1 --loglevel warning
restart: unless-stopped
networks:
- searxng
volumes:
- ./valkey-data2:/data
logging:
driver: "json-file"
options:
max-size: "1m"
max-file: "1"
searxng:
container_name: searxng
image: docker.io/searxng/searxng:latest
restart: unless-stopped
networks:
- searxng
ports:
- "8080:8080"
volumes:
- ./searxng:/etc/searxng:rw
- ./searxng-data:/var/cache/searxng:rw
environment:
- SEARXNG_BASE_URL=http://192.168.5.39:8080
logging:
driver: "json-file"
options:
max-size: "1m"
max-file: "1"
networks:
searxng:
volumes:
valkey-data2:
searxng-data:
|
启动 SearXNG
然后就可以在 http://192.168.5.39:8080/ 访问聚合搜索了。
启动成功后需要停止,然后我们再修改,配置文件支持输出json以及代理。
使用 root 权限编译 searxng/settings.yml
如果你需要配置代理 找到 proxies 部分,需求注释并写上你的代理
我参考的是 https://docs.searxng.org/admin/settings/settings_outgoing.html
1
2
3
4
| # proxies:
# all://:
# - http://proxy1:8080
# - http://proxy2:8080
|
找到 search 部分,在 formats 里添加一条 json。
1
2
3
4
| search:
formats:
- html
- json
|
做完修改后,启动 SearXNG
测试一下是否能够正常获取到 json 格式的数据,如果不能估计是配置错了。
1
| docker exec -it open-webui curl 'http://192.168.5.39:8080/search?q=test&format=json'
|
在 openwebui上添加搜索引擎参考 https://openwebui-doc-zh.pages.dev/tutorials/web-search/searxng/#4-gui%E9%85%8D%E7%BD%AE 进行操作
到这里就已经全部配置完成了。
或者你也可以把所有服务合成一个服务,可以参考下面的配置。
1
2
3
4
5
6
7
8
9
10
11
12
13
14
15
16
17
18
19
20
21
22
23
24
25
26
27
28
29
30
31
32
33
34
35
36
37
38
39
40
41
42
43
44
45
46
47
48
49
50
51
52
53
54
55
56
57
58
59
60
61
62
63
64
65
66
67
| services:
ollama:
volumes:
- ./ollama:/root/.ollama
container_name: ollama
pull_policy: always
tty: true
restart: unless-stopped
image: ollama/ollama:latest
deploy:
resources:
reservations:
devices:
- driver: nvidia
count: all
capabilities: [gpu]
redis:
container_name: redis
image: docker.io/valkey/valkey:8-alpine
command: valkey-server --save 30 1 --loglevel warning
restart: unless-stopped
volumes:
- ./valkey-data2:/data
logging:
driver: "json-file"
options:
max-size: "1m"
max-file: "1"
searxng:
container_name: searxng
image: docker.io/searxng/searxng:latest
restart: unless-stopped
volumes:
- ./searxng:/etc/searxng:rw
- ./searxng-data:/var/cache/searxng:rw
environment:
- SEARXNG_BASE_URL=http://searxng:8080
logging:
driver: "json-file"
options:
max-size: "1m"
max-file: "1"
open-webui:
image: ghcr.io/open-webui/open-webui:main
container_name: open-webui
volumes:
- ./open-webui:/app/backend/data
ports:
- 3000:8080
environment:
- 'OLLAMA_BASE_URL=http://ollama:11434'
- 'WEBUI_AUTH=False'
- 'HTTP_PROXY=http://192.168.1.200:7897'
- 'HTTPS_PROXY=http://192.168.1.200:7897'
- 'NO_PROXY=127.0.0.1,localhost,ollama,searxng'
extra_hosts:
- host.docker.internal:host-gateway
restart: unless-stopped
volumes:
ollama: {}
open-webui: {}
valkey-data2: {}
searxng-data: {}
|
这里我未暴露 searxng 所以相应的,测试连接应该改成 docker exec -it open-webui curl 'http://searxng:8080/search?q=test&format=json'
搜索引擎还是要在 ui上设置,我使用 https://openwebui-doc-zh.pages.dev/tutorials/web-search/searxng/#docker-compose-%E8%AE%BE%E7%BD%AE 进行设置不生效。
注意搜索引擎地址应该填成 http://searxng:8080/search?q=<query>